Trucky Integration
Introduction
In this article you will find out how to stream data from Trucky's VTC Hub to Drivers Hub and how to pair your Drivers Hub with your Trucky VTC.
This article was prepared specifically for Drivers Hubs operated by The Drivers Hub Project (CHub), if you want to access the general article shared by Trucky, you can visit the link here: https://truckyapp.com/kb/vtc-hub-api-and-external-drivers-hub-integration/
We also support TrackSim as tracker, whose configuration procedure should be similar to Trucky's and we will not be providing a separate guide. The only thing to be changed is the trucky in the webhook URL (should be tracksim).
Phase 1: Gathering Trucky VTC Hub Company Credentials
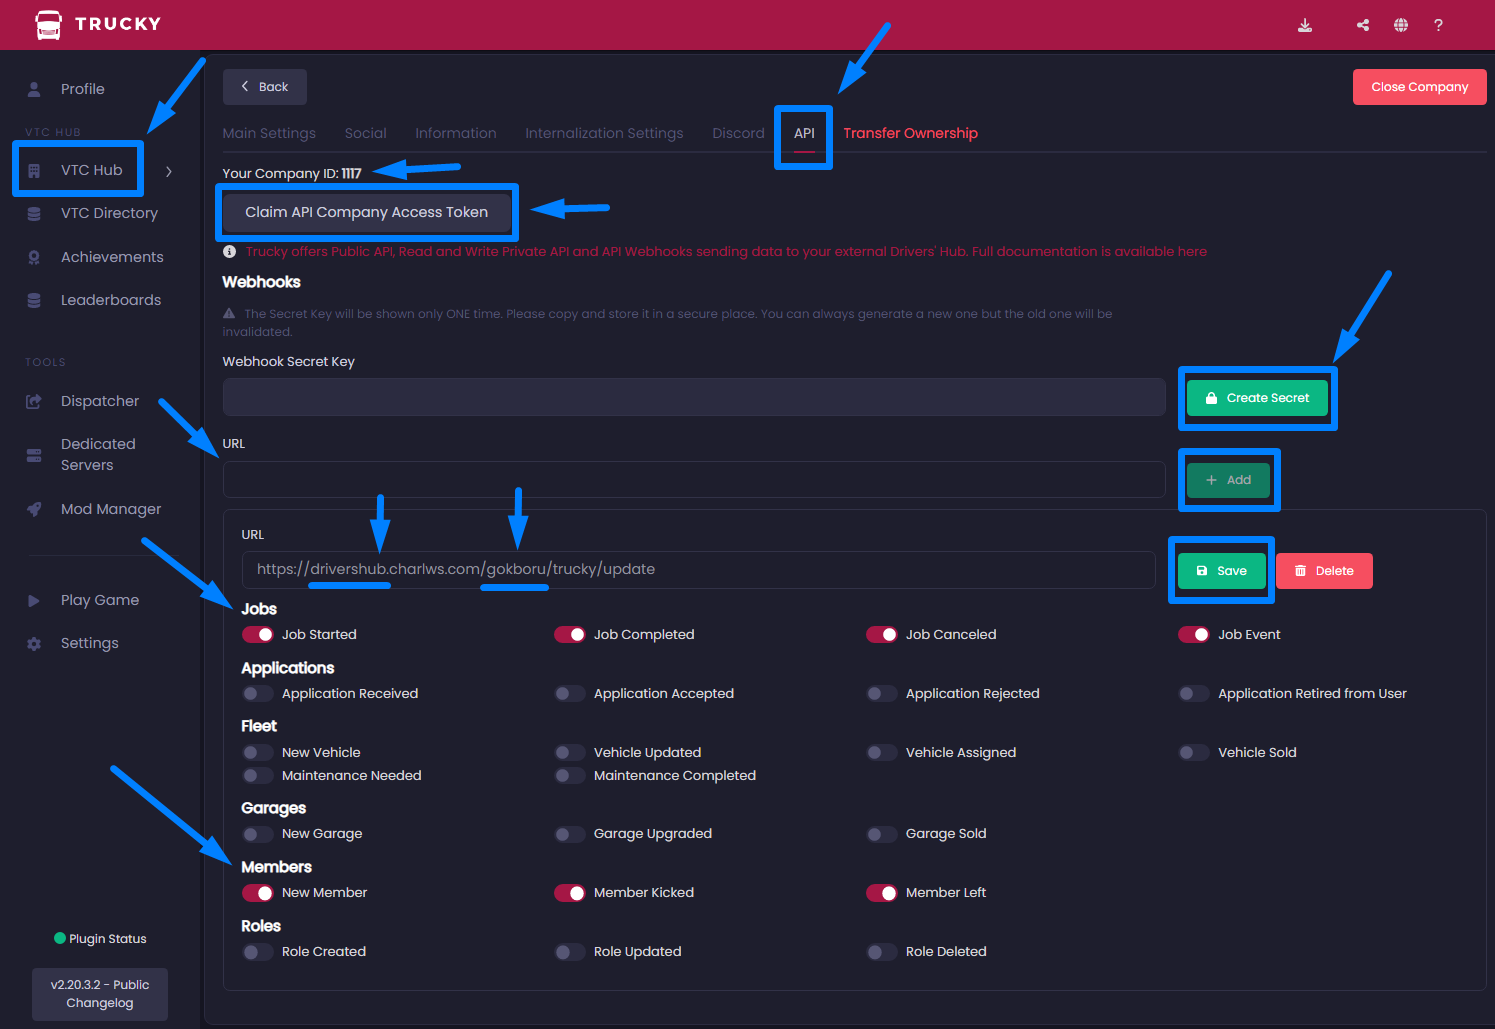
Some credentials are needed for CHub to transfer or receive data to your Trucky VTC. You can access these from the "Trucky Desktop App > VTC Hub > Dashboard > Company Settings > API" tab.
Important Note: Due to security measures, you must be the owner of the company to access the API tab of your Trucky VTC.
There are 3 credentials you need: "Company ID", "Company API Token" and "Webhook Secret Key".
Once you have all this, you will need to go to Phase 3: Saving Credentials Gathered from Trucky to CHub API
Phase 2: Adding/Creating Webhook URL to Trucky VTC Hub API and Activating Events
The API endpoints you have on CHub vary depending on the tier of your CHub subscription. For this reason, the Webhook URLs you enter for Trucky will also be different.
-
Special Guest Webhook URL:
https://drivershub.charlws.com/{hub_unique_id}/trucky/update -
Premium Plan Webhook URL:
https://drivershub05.charlws.com/{hub_unique_id}/trucky/update -
Regular Plan Webhook URL:
https://drivershub10.charlws.com/{hub_unique_id}/trucky/update
If you do not know or have forgotten the unique ID that you need to enter in the {hub_unique_id} field, you can check the abbr field on the page https://config.chub.page/config?domain= (add the domain of your VTC to the end of this URL, do not include https:// or /)
Example: https://config.chub.page/config?domain=hub.gokboru.net.tr
After completing this process, you should now have your Full Webhook URL.
Example: https://drivershub.charlws.com/gokboru/trucky/update (GökBörü VTC is a Special Guest on CHub and its abbreviation is gokboru)
After adding the webhook URL, you come to the stage of which Events will be allowed. The current level of data exchange between CHub and Trucky is coded only as Jobs and Members, but the scope of this may expand further in the future.
Therefore, you should activate the "Job Completed, Canceled" and "New Member" events and save the webhook. If you wish not to sync new drivers from Trucky to Drivers Hub, you may disable the "New Member" event. "Member leave" events are not supported as we require a double confirm on Drivers Hub when a driver leaves. (Note that when drivers resign / are dismissed from Drivers Hubs, they will be removed from Trucky company automatically.)
Phase 3: Saving Credentials Gathered from Trucky to CHub API
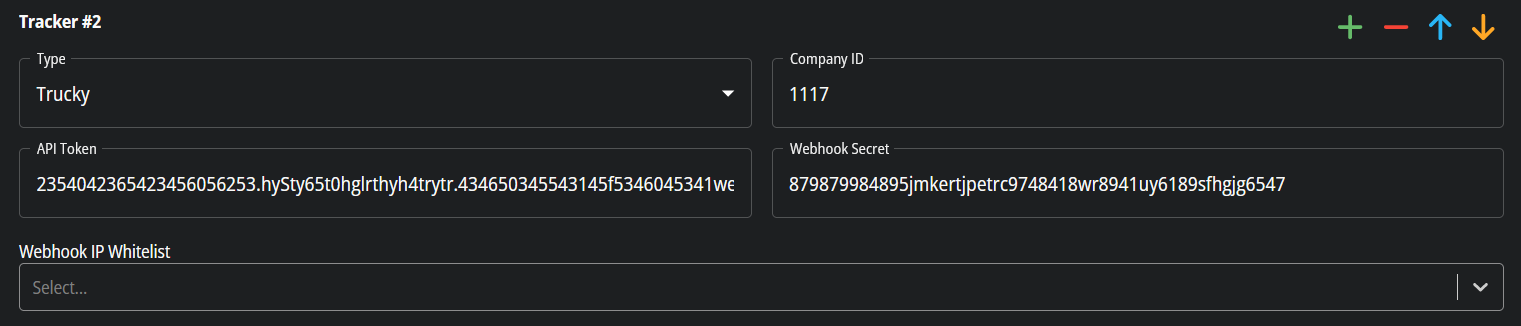
By adding the following attributes and values to a desired field in Drivers Hub - Configuration - Tracker in accordance with form, you have enabled the data transfer of your Drivers Hub with Trucky.
Note: You may ignore the Webhook IP Whitelist field.
After this stage, you have completed all phases and steps, your Drivers Hub is now linked to your Trucky VTC and will start transferring data.
Data to be transferred and actions to be taken by the integration;
- All completed or canceled jobs.
- When the "driver" role is given to the member on Drivers Hub, the relevant member will be added to Trucky VTC, or when the role is removed, the relevant member will be removed from Trucky VTC as well, or when the member leaves the Drivers Hub, they will be kicked from Trucky VTC.
- When the driver is added to the Trucky company, and if the driver exists on the Drivers Hub, the relevant member will be accepted as member and added driver role.